Tutorial: Build Your First Chatbot
In this tutorial, you’ll go from zero to a working AI chatbot on your website. We’ll walk through every step together: signing up, adding your content, creating a bot, testing it, and embedding it.
Time needed: depends on your sources. Could be 15 minutes or 2 hours (in case the website being crawled is not LLM-friendly - too much Javascript)
What you’ll need:
- A website with content you want your bot to learn from (your documentation, help center, e-shop, blog, etc.)
- Access to your website’s HTML (to paste the embed code)
What you’ll learn:
- How to create a workspace and add a knowledge source
- How to create and configure a chatbot
- How to test your bot and read the debug panel
- How to embed the widget on your website
Step 1: Sign up and create a workspace
Section titled “Step 1: Sign up and create a workspace”- Go to ChatbotIQ and sign in with Continue with Google or Continue with email (no password needed - you’ll get a one-time passcode).
- Enter your name and create a workspace (e.g., your company name).
- You start on the Free plan, so no credit card is needed to get going.
Step 2: Add your website as a knowledge source
Section titled “Step 2: Add your website as a knowledge source”Your bot needs content to learn from. Let’s add your website.
- Click Knowledge Base in the left sidebar.
- Click the ”+ Add Source” button.
- Choose Website as the source type. You can also choose other source types.
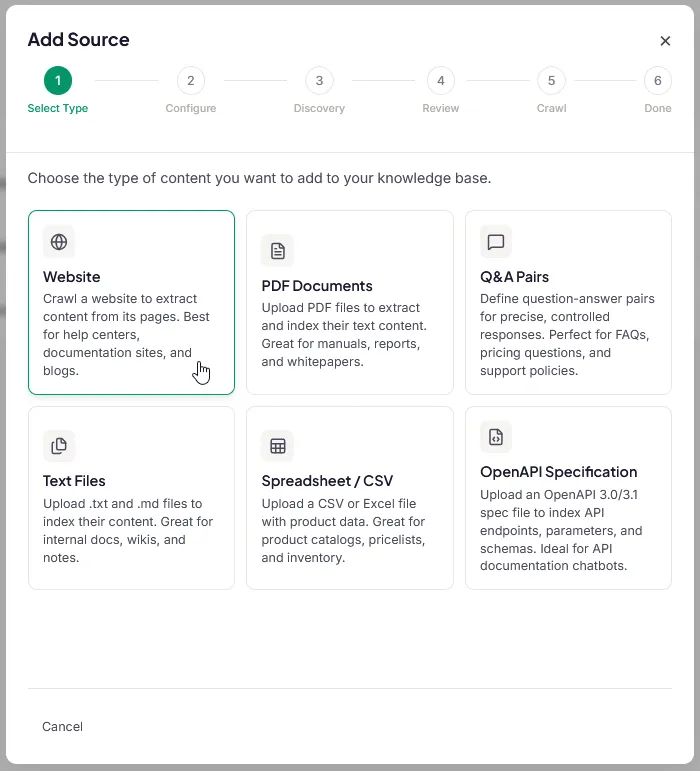
- We recommend choosing AI-assisted configuration (discovery - crawling - indexing).
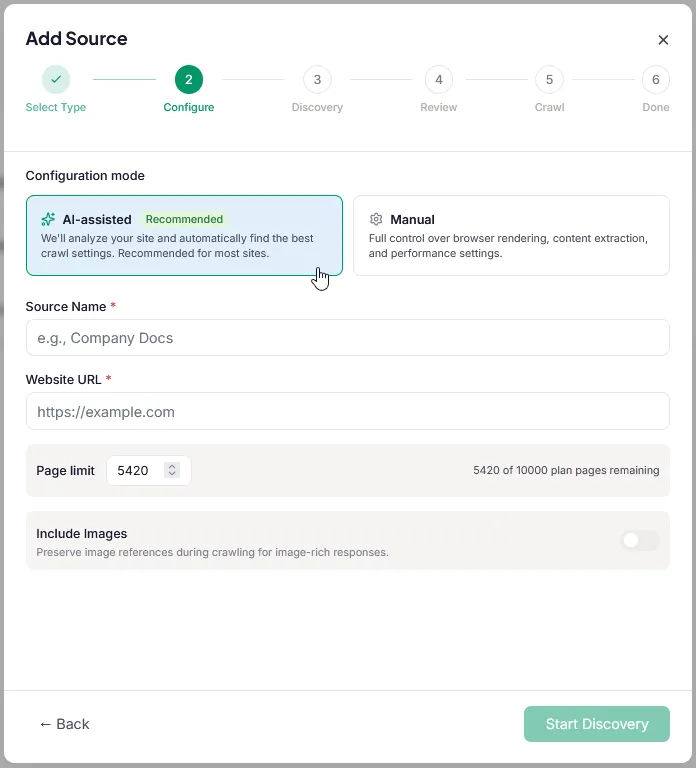
- Enter the source name and your website’s URL (e.g.,
https://docs.yourcompany.com). - Enable Include Images if you want also images to be retrieved (and then included in chat responses).
- Click Start Discovery.
ChatbotIQ will scan your site for pages. This usually takes a few seconds (in case the Sitemap is available) - it reads your sitemap to find all available pages. Otherwise it triggers the Thourough mode which browses the website to discover all available pages.
- Review the discovered pages. You’ll see a list of every URL found. Use the filter if needed! Deselect any pages you don’t want (like legal pages or duplicate content).
- Click Start Crawling.
Now ChatbotIQ visits each page, extracts the content, and creates searchable embeddings. You’ll see a progress bar. You can also close the dialog and let Chatbotiq process everything in background:
- Crawling: downloading pages (you’ll see “12/47 pages crawled”).
- Indexing: converting content into embeddings and inserting into the vector database.
- Ready: All done! Your content is searchable.
Tip: For your first test, start with a smaller source (under 100 pages). This keeps the crawl fast so you can see results quickly. You can always add more sources later.
While the crawl runs, let’s create your bot.
Step 3: Create your bot
Section titled “Step 3: Create your bot”- Click Bots in the sidebar.
- Click “Create Bot”.
- The creation wizard walks you through six steps:
Basic Info
- Give your bot a name, like “Support Bot” or “Docs Assistant.”
- Select the content type that matches the sources you provided. The bot will be automatically pre-configured to meet the needs of that specific content.
If you need the bot heavily customized, contact us for “Expert Setup” it is a premium service where our team hand-tunes your bot’s prompts and retrieval settings for your specific domain. Expert Setup is included at no extra cost in the Bot Success Program (annual Standard and Business plans), or available as a one-time purchase for other plans.
Sources
- Select the website source you just added. Or leave it on “All sources” if you want the bot to use everything.
Model
- Pick the model that powers your bot. GPT-5 Mini is a great default. It’s fast, accurate, and the most cost-effective option. We recommend starting with this one as the quality of response will be still great while leaving you space for more potential messages to be responded (it consumes less credits than top LLM models).
Behavior
- ChatbotIQ detects the language of your content and suggests a Base Prompt (tone and style).
- You can accept the AI-generated suggestion, edit it, or write your own from scratch.
- Example: “You are a friendly and helpful assistant for [Company]. Answer questions based on the provided documentation. Be concise but thorough.”
- Add suggested questions that will appear in the bot’s widget when fresh-opened.
- Specify whether you want to include citations in responses with links to sources.
- Decide whether to include images in bot’s responses.
Support
- Optionally enable human handoff so visitors can request a live agent when the bot can’t help.
- Optionally enable a contact form that collects name, email, and message when the bot can’t answer.
- You can skip this step and configure support settings later.
Review
- Confirm your choices and click Create.
Your bot is created. Let’s test it.
Step 4: Test in the Playground
Section titled “Step 4: Test in the Playground”- On the Bots page, click “Design & Deploy” on your new bot.
- The Playground opens with a live widget preview on the left and a customization panel on the right.
- Design you widget. Make it visitor-attractive and matching your style. There are plenty of customization options. See use-the-playground.md.
- Click the chat launcher in the preview and type a question about your website’s content. For example: “How do I get started?” or “What features do you offer?”
- Watch the bot respond with a streaming answer, complete with source citations.
Check the Debug panel
Section titled “Check the Debug panel”- Click the Debug button at the bottom of the preview to see the source chunks, relevance scores, token usage, and response time for each answer. If the bot gives a wrong answer, the Debug panel tells you why.
Step 5: Embed on your website
Section titled “Step 5: Embed on your website”Once you’re happy with how the bot works:
- Switch to the Deploy tab in the Playground.
- Important: Set your bot to Public mode. Open Bot Settings (the gear icon ⚙ in the header) → Privacy → Public. Without this, the widget won’t work on external websites.
- Copy the embed code.
- Open your website’s HTML and paste the code before the closing
</body>tag. - Save and deploy your website.
Now visit your website. You should see the chat launcher in the bottom-right corner.
Click it, ask a question, and watch your AI chatbot answer with accurate, cited information from your own content.
Congratulations. Your first AI chatbot is live!
What’s next?
Section titled “What’s next?”Here are some things you might want to do now:
- Match Your Widget to Your Brand - customize colors, fonts, and the launcher to match your website
- Improve Your Bot’s Answers - tune the prompt, threshold, and other settings
- Configure Crawling - optimize content extraction for your specific site type
- Find Knowledge Gaps - see what your visitors are asking that your bot can’t answer yet
- Add More Sources - add PDFs, Q&A pairs, or additional websites